The Making Of: Accord (Drakengard) PART 1

My usual style of making cosplays is “binge-craft in a night and suddenly with no warning I have a new cosplay.”

However, lately I’ve been making a more concentrated effort to pause and take process pictures, especially on my more elaborate or effort-heavy cosplays. That said, this post will be very image-heavy.

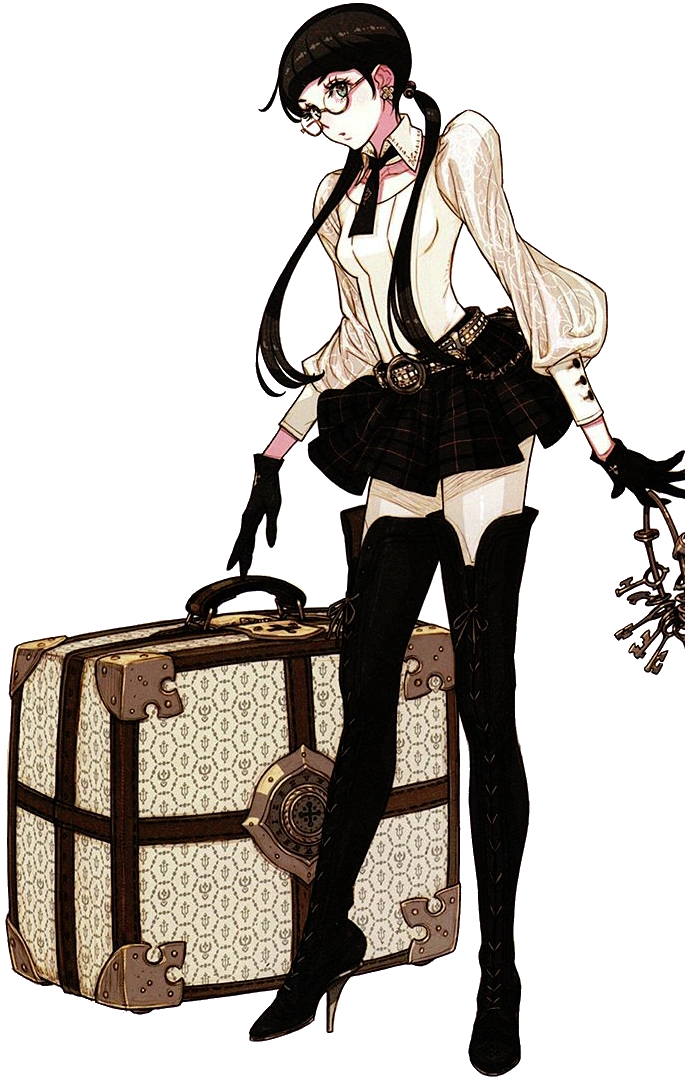
A friend asked me to cosplay Accord along with her Zero in the future, so I looked her up and absolutely fell in love with her design! I don’t “do” video games and have never owned a console in my life, but I watched full playthroughs of Drakengard 3 on YouTube to familiarize myself with it. (Including all the different endings, because I’m nothing if not a completionist.)

I made her over the span of several months, since I took a hiatus in between to focus on other projects. She was finally finished in November of 2018, and luckily I had the chance to shoot her just a few days later!

Photo // momstressfull on Instagram

First, I made the skirt out of a seasonal flannel from my local Joann. I was lucky to find a print and colour palette similar to hers!

It’s pretty much just a basic pleated skirt, so there’s not much else to say about it here.

Then, I made the bodice of the shirt! I loosely based the pattern off of a blouse I already owned, and fiddled with it for a while until I was happy with how it fit.

I used fabric that had been sitting in my bin for years, so not sure the origin or exact type – I reckon it’s a sport twill, it’s heavy with a slight stretch across the grain. It is ever-so-slightly off-white.


Please ignore the blue zipper, it was a placeholder until I could get to the store for a matching white one.

Time for the sleeves! I was excited to get to these, since I love doing puff sleeves.

I made them out of a chiffon maybe half a shade darker than the bodice (although that could be due to the translucent nature of the fabric.)

I find I prefer doing pleats to gathering – it looks cleaner to me and this way I can be sure it’s even.

I then sewed them to some simple cuffs I’d made from the same fabric as the bodice (I just took the rough measurement of my wrist and the length I wanted them to be, and made a rectangle with those measurements.)

There it is so far! Excuse the no-makeup face.

I finished off the cuffs with buttons! I sew the buttonholes manually using a 0-width zigzag stitch on my machine. It took some practice but I’m able to get them pretty neat now.

I made the collar out of the same twill fabric as the bodice and cuffs. I copied the pattern from the same blouse I already owned.

Probably the neatest a collar I’ve done has ever come out. Same process with making the buttonhole manually on my machine, then hand stitching on the button.

The decorations on her collar were where things got complicated. To me they look like they’re most likely meant to be cutouts, but I didn’t think I could do that and still have it look nice. Also with Drakengard characters, the elaborate designs are pretty open to interpretation and I was working on a budget after spending more than expected on the fabric for this, so I decided to just use what I had.

First, I made the design in the corners out of some spare gold vinyl trim. (It’s the same one I used for Mordred, available at Joann Fabrics!)

I cut out the shapes then pressed them down on the collar using E6000.

Then I used small clear beads for the detail around the edge of the collar. I measured out even spaces and marked where I wanted them, then sewed each one down by hand.

Here’s the collar all done!

The belt was another thing I had to fudge a bit, but I did the best I could with what I had access to. I made it from a long strip of upholstery vinyl, looped it around a round belt buckle from a local independent fabric store, and sewed on the stud beads by hand (harvested from a hat, which I later used to make Marie Antoinette from FGO! That “Making Of” post is coming soon.)

I kind of wish I had taken more pictures but it’s a very simple thing I made in one evening, so one picture is about all it deserves.

It was after everything else was finished and the night before the shoot was scheduled that I remembered, she has a tie and earrings.

I (very) quickly made a fake one that I pin to my collar out of some spare black fabric left over from a long-forgotten project.

I made the emblem on it out of some gold trim, tied down with gold embroidery thread, and a gold sequin in the center.

The earrings were made with some scrap Wonderflex (a thermoplastic similar to Worbla,) glued down to some old stud earrings.

They are admittedly not very pretty, but they’re mostly covered by hair anyway and I’ll clean them up if and when I rewear Accord.

I have a nice pair of black leather gloves that I wear during the winter and had planned on using for Accord, but they were just slightly too long and bulky to fit comfortably with the sleeve cuffs. I made some new ones by tracing my hand and copying the pattern onto some Yaya Han stretch pleather. Shiny!

I’ll detail how I made the wig and boots in a separate post coming soon!

All in all, Accord was a great project and I’m happy I made her! I love doing characters that are cosplayed less often, people’s reactions to seeing them are always the best.

Photo by momstressfull on Instagram

Thanks for reading!

Wig Tutorial: Converting Saber Arturia to Saber Nero!

Arturia Pendragon and Nero Claudius have almost the same hairstyle, but with one distinction – the front piece of Nero’s hair has a swoop to it. I feel it’s necessary to include that detail because they’re so similar-looking otherwise.

While they do sell pre-styled wigs for both characters, I just couldn’t bring myself to buy two near-identical wigs when there was the alternative of simply styling my Arturia wig into Nero whenever I needed to switch it up.

Left – the wig I have, an Arturia wig from AOICos on Taobao. Right – Nero wig from Amazon.

Now, the difference in the pre-styled wigs lies in the way they’re sewn together – Arturia’s is made like a typical ponytail wig, with the hair that makes up the bangs lying flat. Nero’s has a couple lines of wefts at the back of the bang section sewn in at an angle, so they’re separated from the rest of the hair and form a poof at the base.

The way I style will not replicate this exactly. If you plan on cosplaying Nero more or if you have the space for both wigs, it might be worth it to you to get a Nero wig like the one above.

However, I felt like I could reasonably fudge this for a Nero shoot (and again, didn’t want to buy a second wig that was almost exactly the same as one I already owned.) An Arturia wig can be styled into Nero and back again, but it’d be difficult to style Nero into Arturia without permanently altering it.

Step 1.

Get ya wig! This is my Arturia wig bought from AOI Cosplay on Taobao, all I did was take it out of the bag and comb the bangs.

Step 2.

I separated the top section of the bangs. This will be the hair used to create the swoop.

Step 3.

I divided the section into two even pieces and clipped. I also pinned back the ahoge to keep it out of the way until later.

Step 4.

Unfortunately there’s no good way to take this picture without an extra set of hands, but I liberally sprayed the underside of each section from the base to about a quarter of the way up with a strong hairspray. (Any max. hold will do, but I do recommend Got2B Glued for wigs!)

Step 5.

While the hairspray is still wet, immediately go over it with a hair dryer. If your wig is non-heat resistant beware of melting fibers, start the dryer on a low setting just in case.

Step 6.

The most important part of styling wigs with heat is how the fibers cool! Synthetic fibers will retain the shape of however they cooled, so use clips to hold them at the rough height you want your swoop for at least 5-10 minutes.

Step 7.

Now that the hair is cool and dry, you have the rough outline. I’ve found it’s important to get the height first, then work on cleaning it up.

As you can see in the back of these photos, the hair has dried in sort of a seagull-wing shape, so it’s not exactly how I want it just yet.

Use your fingers to gently separate the fibers and tilt them against the head to form a “shell” shape. This will also help get rid of the bump left by the clip.

Once you have it where you want, repeat the process of hairspraying and blow drying.

Step 8.

Once everything has cooled and dried again, you can GENTLY brush it using small strokes to loosen the fibers and remove excess product, so it looks a bit more natural.

Step 9.

Time for the ahoge!

Using the same process, I held the piece up with my fingers so it stood vertically, then sprayed all around it from the base to about a third of the way up. I then blowdried it while the hair was still wet, and pinned it into a large curve while it dried.

Step 10.

I also lightly sprayed the end of the ahoge to define it against the bangs.

Step 11.

Umu complete! Enjoy your wig.

Featuring VERY messy bangs since I took this selfie right after a shoot. Will update this later with actual pictures.

Bonus tip: If you want to convert your wig back, gently wash the treated area with water, run a wig brush through it, and use a blow dryer to smooth it back down.

Go-To Poses for Cosplay Modeling

This info is lifted pretty much directly from my Posing & Photoshoots panel. I thought putting it here would make it more accessible!

Through my ~5 years of doing photoshoots in both cosplay and regular modeling, I’ve found I keep coming back to a few poses and shots that I know work for me. These are easy enough that they can be done by just about anyone, and versatile enough that they work for just about any character.

I can’t give you a formula to follow for an automatically successful photoshoot, but here are things from my own repertoire that you can hopefully build off of to find your own.

Power Stance

DSC_0088.jpg
Photo // Con Mom Photography

Back straight, shoulders back, legs apart and standing solidly. I usually put one hand on my hip and have the other one by my side, but keep my elbow away from my body, with my hand relaxed and slightly open. You can tilt your head or keep it straight, but make sure your chin is upwards.

Standing, But Make it Fashion

Photo // GwenPie Snaps

Back straight or even curved, shoulders back, head slightly tilted. Putting one foot slightly in front of the other elongates your legs and makes you look taller and slimmer.

Photo // Angelic Daze

Sitting, But Make it Fashion

Photo // momstressfull

Sit against a wall or in a corner. Have one leg fully extended, the other knee bent slightly. Put the hand closest to the wall on something, relax the other one. A slightly tilted head works great for this one as well!

Inspect an Object

Put the focus of the picture on an object rather than the person in it. Look at it, touch it, do something with it.

This type of shot feels very “in character,” rather than a portrait of a cosplayer.

Over the Shoulder

Photo // White Specs Photography

Back to the camera, turning your torso and head around to face it.

Disclaimer that if this one hurts, you’re doing it right. You need to bend as far as possible to be visible to the camera, but it does make for a pretty cool photo.

Photo // D. L. Gital

Lying Down

This is incredibly versatile!

It can look very soft and serene…

Photo // AK4Real Photography

…Or a little strange and “off,” depending on how it’s shot.

IMG_5970.jpg
Photo // Zealous Photography

The mood of the photo is dependent on the angle of the camera!

In the first image, I’m lying on a flat surface and the photo is taken from straight above me.

In the second, the angle is much more dramatic. We achieved this by lying me on top of a staircase and tilting my head back over the first stair, with the photographer standing at the bottom of the staircase, so the camera is far below me.

The more exaggerated the angle, the more eerie the photo feels.

Invisible Hot Dog

Photo // World of Gwendana

This is the official term.

Stick your hand out, open with your palm facing up and fingers slightly relaxed and curved (as if you’re holding an invisible hot dog.) Point it slightly below the camera lens. Profit!


That’s about all I got for now, thanks for reading!

Preparing for Cosplay Photoshoots

Arriving prepared is half the battle when it comes to shoots! What can you do at home, before any camera shutters click?

References

I always find references for shots and poses when researching a character, and am constantly on the lookout for nice shots. I get a lot of inspiration from other cosplayers and models, fashion and editorial photography, and fantasy/conceptual photography.

If I like anything about the picture; the framing, the layout, or especially the way the model is posing, I’ll screenshot or save it to a folder on my phone so I can easily pull it up as needed. (I’ve also seen people create moodboards on Pinterest, if that’s more your speed.)

I’ve found most of my inspiration pics through daily browsing, but you can also use specific keywords on Google or even Instagram to find photos that have the type of feel you want.

For instance, if you already know where you’re going to shoot, try searching for shoots done in similar locations. E.g. wheat field, arcade, city street.

Photo // AK4Real Photography

You can also try searches involving outfits similar to what you’ll be wearing. Many photos of my ballgown cosplays were directly inspired by wedding pictures, since they involve similar dress shapes (and fanciness levels.)

Photo // AK4Real Photography

Boil your cosplay down to what it would be recognized as – a school uniform, modern streetwear, a samurai, etc. Use those keywords to find ideas from other shoots.

Photo // PaoImages

Standing around trying to think of something to do will waste both your time and the photographer’s. If I booked a half hour slot, I want to use as much of that time as possible taking pictures. Having some quick ideas to go to will streamline the process and give you something to work off of to make it your own. There’s a chance your photographer may not be familiar with your character, so it also gives them a better idea of what you want!

One disclaimer I’ll add to this is that I always use pictures of real people, rather than anime or fan art. This may come as a shock to some, but a lot of anime characters are drawn in a way that can’t be accurately replicated in real life. Real people have things like a spine and organs that get in the way of the back-breaking poses our 2D counterparts achieve. When I’ve seen people try to base their own poses off of art, they’ve either had to fundamentally change something about the image to make it work, or they’ve just been unhappy with how it came out.

Practice at Home

If you have a large (full-length is best!) mirror at home, put your cosplay on and pratice some poses beforehand while you can find what you think looks most flattering from the camera’s point of view.

Pay close attention to key body parts. Where are your feet pointing? How are you angling your hips? How about your shoulders?

Photo // GwenPie Snaps

Personal example above: The cut of this top makes my shoulders look very wide, so when posing I push them back and put some hair in front of them. I do like my legs and these boots, so when posing in this cosplay I’ll put my legs in full view of the camera, with one foot slightly in front of the other to elongate them.

This also applies to your face! Do a test run of your wig and cosplay makeup and practice various angles and expressions. It’s also helpful to do this by taking various selfies using your phone camera, that way you can closely look at and review them. We’ve all had moments of realizing wow, my wig looks really weird from this side. Or hey, I really like how I look with this expression as opposed to that one.

Photo // kkosasiphotos

Another personal example: everyone’s face is a little asymmetrical, and I’ve found I prefer the right side of my face to the left. So if my head is turned for a shot, I’ll normally turn to show my right side to the camera! Tilting your chin slightly downward makes it look smaller and puts emphasis on the eyes, which creates a flattering “girly” look.

Make Sure Your Cosplay is Ready

The night before the photoshoot, gather all the pieces and make sure they’re clean and finished. Iron or steam your cosplay and put it on a hanger in immediate view. If there are small accessories, put them in a plastic bag and put that on the hanger as well, or even in your bag. Make sure your wig is brushed and styled how you want it, set it on a wig head near your cosplay.

This way there’s no scramble to find missing pieces, when you’re ready to head out you can grab it all and be ready to go!

Bring an emergency kit! This doesn’t have to be anything elaborate, but mine includes makeup essentials to reapply in case any decides to go astray (I normally at least bring lash glue, concealer, and whatever lipstick I’m wearing,) a travel brush for my wig, some bobby pins, and a few safety pins. All of this fits in my makeup bag!


That’s it for now, thanks for reading!

And so it begins.

Obligatory introduction post, ahoy!

Disclaimer that at time of writing, this blog is under construction. Any janky code or dead links will be fixed soon, I promise.

So.

A blog.

In the year of our Lord, 2019.

Do people still have blogs anymore? I remember when everyone had one, about anything you could think of. And now here I am, at the ripe old age of 23, sitting down and fiddling with themes on WordPress. (If CakeWrecks can still have an active blog in the traditional sense of the word, then SO. CAN. I.)

If you’re here, you’ve likely been led here under false pretenses of good content by my other social media, in which case you already know who I am. (If you’ve somehow stumbled upon me, welcome! Check out my About page, which should hopefully be up and running by the time this post is published.)

I started this mainly to have a place to put my wordier bits. Things I want to say that I feel are too lengthy for the bits and pieces I put on Twitter or Instagram.

I have some walkthroughs in the works of how I made certain cosplays, spoiler alert this blog is just an excuse for me to get better at taking process pictures.

I’ll also be doing some informative posts on cosplay-adjacent topics, such as posing, working with photographers, and translating cosplay into real life.

I tend to be The Actual Worst about sticking to regular posting schedules if I state them publicly, so I won’t yet. I’m thinking either weekly or biweekly, but we’ll see how much I like this.

Thanks for stopping by!

Design a site like this with WordPress.com
Get started